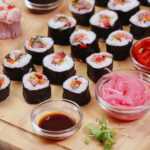
Sushi Style Beef Rolls with Pickled Veggies
Sushi Style Beef Rolls are a delicious spin on traditional sushi! Seared beef pairs perfectly with both fresh and pickled veggies - the combinations are endless! These beef rolls are great for light meals and easy entertaining. LOTS of step-by-step suggestions and recipe tips included!
Ingredients
- ½ - ¾ lb. Beef Sirloin Tip Steak – or other lean cut, trimmed of any fat
- 1 - 2 Tbsp. low sodium Tamari or soy sauce
- ¼ - 1 tsp. each: lemon pepper, granulated garlic, red chili flakes, or preferred seasonings, to taste
- ¼ - 1/3 cup prepared roasted red peppers, cut into thins trips (I used Mezzetta Roasted Red Bell Pepper Strips)
- 1 mini cucumber, or English cucumber, cut into matchsticks
- 1 med. carrot, peeled and cut into matchsticks
- ¼ - 1/3 cup Kicked-Up Quick Pickled Red Onions (or other pickles) - recipes below
- 2 – 3 cups cooked sushi rice, prepared per package instructions
- ¼ - 1/2 cup lite seasoned rice vinegar + more to taste (for seasoning the rice + rice water)
- 3 - 5 sheets Nori seaweed wrap (I used Sushi Chef Nori)
Instructions
-
Coat beef with Tamari or soy sauce. Then, season to taste. Pan sear or grill the beef to desired doneness (Rare: 145°F, Medium: 160°F,Well Done: 170°F). Cover cooked beef, and cool to room temperature. Refrigerate for at least 30 minutes for easier slicing. Cut thin slices, and then cut each slice into thin strips.
-
Cut jarred/prepared roasted red peppers into thin strips.
-
Cut cucumber into matchsticks about 3 - 4” long, about the width of a pencil.
-
Peel and cut carrot into matchsticks about 3 - 4” long and half the width of a pencil, or thinner if preferred.
-
Prepare sushi rice as recommended on packaging. NOTE: Use short grain rice specifically labeled “sushi rice” - it’s stickier and holds together better in rolls.
-
Place cooked rice in a low-sided dish or pan. Allow rice to cool for a few minutes. Season the rice by drizzling ¼ cup lite seasoned rice vinegar evenly over the rice. Then, gently stir and fluff the rice with a flat spoon or spatula. Use light, sideways strokes to avoid smashing the rice. Taste, and add more rice vinegar as needed so the rice is evenly seasoned.
PREP :
-
Prepare a “rice water” bowl with about 1½ cups water and ¼ cup lite seasoned rice vinegar. This will be used to dip your hands and knife in so the rice doesn’t stick.
Wrap the sushi mat with two or three layers of clingwrap prior to using, or lay a single fresh sheet of cling wrap on the mat for each roll. This keeps the mat clean and allows better control. Alternatively, if using a silicone baking mat or a thick hand towel, place a single layer of cling wrap on top for each roll.
ROLLING TIPS :
-
Place the Nori lengthwise, shiny side down, on your cling wrap-covered sushi mat. Place about ½ cup of sushi rice on the Nori. Dip fingertips in the rice water, and evenly press out the rice on the Nori. You may need to add more rice and dip your fingers in the rice water several times throughout the process. Completely cover the bottom and sides of the Nori with rice, edge-to-edge, leaving about 1 inch uncovered across the top.
-
Place one or two rows of beef across the width of the pressed rice – all the way to the edges. Continue adding thin rows of red peppers, pickled red onions (and/or other quick pickles), cucumbers, and carrots beside the beef. Thin, even layers of rice, beef, and veggies are key – don’t try to “stuff” the rolls.
-
Dab rice water along the top edge of the Nori. Begin rolling from the bottom, up. Hold the filling in place with your fingers as you roll the mat forward/up with your thumbs. Using gentle, even pressure, roll until the bottom of the roll connects with the rice. Pull the sushi mat forward(out of the roll) as you go, and press lightly to “seal” the Nori to finish.
-
Place the beef roll on a cutting board. Dip your knife tip into the rice water and then tip the blade upward to allow the water to coat the blade. Cut beef rolls into six pieces. Serve with low sodium Tamari(add a little water for smoother flavor) or soy sauce, and Enjoy!